
Windows 10: Changing Your Wallpaper


If you’re here you’re looking to find out how to change your wallpaper in Windows 10.

They did change the name of this feature to Background. So no longer Wallpaper, not sure why they decided this, but it is what it is.

So let’s get started:

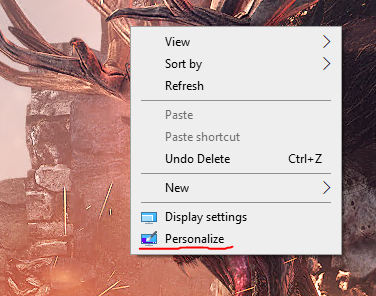
  1. Right-click anywhere on your desktop and click personalize:


  1. You will be prompted with a new Screen with the Background options:


  1. You want to select background on the left and you will see various options for the background.


  1. You will have a few options on the screen, one is the drop-down menu, that is labeled Background


Of the three options, you have:

Picture: This will be just one picture you can pic from your gallery. And this picture will never change. Once you choose this, you must click browse to pic an image from your gallery to use as the background.

Solid Color: this will make the background a solid color, and you can choose the color you want towards the bottom of the page, under choose your background color.

Slideshow: This will allow you to a folder with many images in the folder and it will cycle through all those images on your background. More on how to do this later.  

  1. Once you choose your background type, you will want to choose how it will fit. You will have a couple of options, you just choose one that you looks best to you, but here is what they do:            

Fill: Enlarges or reduces the image so that it fills every inch of the desktop without distortion. Parts may get chopped off, but this option never distorts the picture.

Fit: Your entire photo appears, as large as possible without distortion or cropping. If the photo doesn’t precisely match the proportions of your screen, you get “letterbox bars” on the sides or at the top and bottom.

Stretch: Makes your picture fit the screen exactly, come hell or high water. Your picture may be squished or enlarged.

            Tile: This option makes your picture repeat over and over until the multiple images fill the entire             monitor.

Center: Centers the photo neatly on the screen. If the picture is smaller than the screen, it leaves a swatch of empty borders all the way around. If it’s larger, the outer edges get chopped off.

Span: If you have more than one monitor, this option lets you slap a single photo across multiple screens.

A lot of those settings you can play around with to see if it looks nice and if your happy keep it. At the end of the day, you’re looking at it and should be happy with it.

Choosing the correct image is key, you need an image size that will match your monitor's resolution. I’m going to write another article about how to choose the correct image, you can see this article here:

[insert link here]

I hope this article was helpful for you, if you’re looking for any tech support, either remotely or if you’re in the Middleton WI are, you can contact me at my website:

www.sinntechnologies.net

Thanks for stopping by!


Comments

Popular posts from this blog

Windows 10 How To Create A Zipped Folder

If you’re here, you’re probably looking for a guide on how to Create a Zipped folder. I’m assuming at this point you know what is and just want to compress your files. So let's get started. 1.  Right-Click in the location you want to create a Zipped folder. 2. Click new, then select Compressed Zipped folder. 3. This will create a zipped folder in that location, then give the folder a name. Within the zipped folder, you can drag in whole folders or just files and they will then be compressed.   You can copy and paste folders in and out of the folder, and they will be compressed and decompressed as it is put in and taken out. In this example, we have a folder with a text file with some text. The size of the file in the none compressed folder: The size of the file now smaller in the compressed folder: You can also take a folder that isn’t compressed and make it compressed. Say you have a project with many folders and files and you’re done with it. You can send it to a zipped folde

How To Change Windows Default Sounds

 If you’re interested in how to change windows default sounds, you have come to the right place. Here we will cover everything there is to know about changing Windows default sounds. So let’s get started. 1.  Right-click on the desktop and click personalize. 2.    Then select Themes on the left. 3.    Then there will be an option for sounds. 4.    Once you click on sounds you will be greeted with a new window like below: 5. You will be greeted with all the sounds your computer makes. You can modify these sounds to whatever sounds you would like.    You will see there is a drop-down menu that says windows defaults unless you have already modified your sound in the past, which if you’re reading this, chances are you haven’t. By default, you can only choose no sound or the windows default sounds.  If you modify the sounds, which we will get to, you have the option to save the sound scheme as a different name. That is the save as button.  Then of course you have the delete option, to

Windows 10 Themes Part One

 If you’re here chances are you’re looking to learn how to make a new them in windows 10. You come to the right place as there is a lot of settings we’re going to be covering. This will be a two-part article as I don’t want these to get too long and give you time to digest some of the content and come back to it later. But let’s get started as we have a lot to cover in this tutorial. 1.  First You will want to right-click on your desktop and click the option personalize, like below: 2.    Then on the left-hand menu, we are going to want to select themes: You will be greeted with many options to customize your theme as pictured above. The Top half of the window is your current theme. The bottom half of the window is your saved themes. So they will be themes that you have created in the past that you can still use if you would like. There is also the canned themes that came with Windows that are already there. We’re going to be covering the top half of the first and making a new them