
Windows 10: How To Create A Shortcut.


Windows 10 has many features that you can use. Most will probably go unused when you use your computer because there are 3 ways to do everything.


But the most common question I get when working in the field is how to create shortcuts to information that you would want to get to periodically.


So let’s get started:

       1.Right-click on your desktop and there will be an option for new, then click the shortcut, as pictured below:
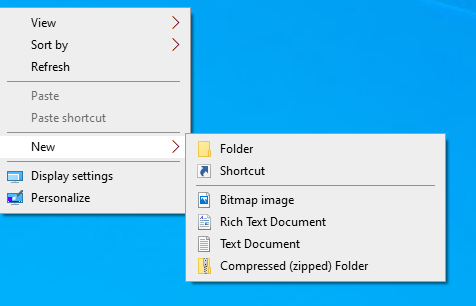
Create Shortcut
      2. You will be presented with a new window asking for the location of the item you want to have a shortcut to, this can be either a web address or it can be a folder location that you want access to. You Would enter that here and click next, as pictured below:
Create Shortcut


     3.  Once you hit next, it is going to ask you to name the shortcut, this can be named anything you like, it is for your reference, for simplicity, I’m naming my new shortcut and clicking next.
Create Shortcut


You now created a new shortcut on your desktop with an icon. You can modify the shortcut with a new picture, you can also set up the shortcut so you can use a quick key on the keyboard to load that shortcut without clicking it if you would like. Let’s check it out.

Adding a shortcut key:


1.       Right-click the shortcut icon and click properties. 
Create Shortcut


2.       Then there should be a section called shortcut key, press any letter while in this section and it will create a shortcut key. The shortcut keys must contain Ctrl + Alt, so it will add this for you automatically.
Create Shortcut


3.       Click apply, then click ok. 


Now if you click that combination of keys while on your desktop, it will automatically open that shortcut. You can actually do this key combination on every desktop icon you have if you wanted to go all out.


Change the Icon of a shortcut.


You can also change the way the icon looks if you wanted to.


1.       Right-click the shortcut and click properties.


2.       In the new menu, there should be a bottom that says change icon. Click it.


3.       Then select an icon you would want to use for the shortcut.


4.       Then press Apply and ok, and you have a new icon for the shortcut.


In this article, we covered how to set up a shortcut and work with some of its features. I hope you found this helpful and be sure to follow me in the future for more guides on Windows 10 and your tech in general.


If you’re looking for any Technical Support, I work in the Madison and Middleton Wi area, I also offer remote support for Windows 10 users. Check my web page for a list of services:

http://sinntechnologies.net/ComputerRepairMiddletonWI


Thanks for your time!

Justin Sinnard

Sinn Technologies

Comments

Popular posts from this blog

Windows 10 How To Create A Zipped Folder

If you’re here, you’re probably looking for a guide on how to Create a Zipped folder. I’m assuming at this point you know what is and just want to compress your files. So let's get started. 1.  Right-Click in the location you want to create a Zipped folder. 2. Click new, then select Compressed Zipped folder. 3. This will create a zipped folder in that location, then give the folder a name. Within the zipped folder, you can drag in whole folders or just files and they will then be compressed.   You can copy and paste folders in and out of the folder, and they will be compressed and decompressed as it is put in and taken out. In this example, we have a folder with a text file with some text. The size of the file in the none compressed folder: The size of the file now smaller in the compressed folder: You can also take a folder that isn’t compressed and make it compressed. Say you have a project with many folders and files and you’re done with it. You can send it to a zipped folde

How To Change Windows Default Sounds

 If you’re interested in how to change windows default sounds, you have come to the right place. Here we will cover everything there is to know about changing Windows default sounds. So let’s get started. 1.  Right-click on the desktop and click personalize. 2.    Then select Themes on the left. 3.    Then there will be an option for sounds. 4.    Once you click on sounds you will be greeted with a new window like below: 5. You will be greeted with all the sounds your computer makes. You can modify these sounds to whatever sounds you would like.    You will see there is a drop-down menu that says windows defaults unless you have already modified your sound in the past, which if you’re reading this, chances are you haven’t. By default, you can only choose no sound or the windows default sounds.  If you modify the sounds, which we will get to, you have the option to save the sound scheme as a different name. That is the save as button.  Then of course you have the delete option, to

Windows 10 Themes Part One

 If you’re here chances are you’re looking to learn how to make a new them in windows 10. You come to the right place as there is a lot of settings we’re going to be covering. This will be a two-part article as I don’t want these to get too long and give you time to digest some of the content and come back to it later. But let’s get started as we have a lot to cover in this tutorial. 1.  First You will want to right-click on your desktop and click the option personalize, like below: 2.    Then on the left-hand menu, we are going to want to select themes: You will be greeted with many options to customize your theme as pictured above. The Top half of the window is your current theme. The bottom half of the window is your saved themes. So they will be themes that you have created in the past that you can still use if you would like. There is also the canned themes that came with Windows that are already there. We’re going to be covering the top half of the first and making a new them