
How To: Turn Off Hibernation in Window 10

How To: Turn Off Hibernation in Window 10

If you’re ever having trouble with your computer not waking up after you put it to sleep, you may be having trouble with Hibernation.

Essentially when you put the computer to sleep, it puts the computer into a very low power state but keeps all the documents you’re working on in memory, so your computer can start up again quickly and have what you’re working on available to you again.

If your computer is sleeping for a certain amount of time, it then will go into hibernation mode. It will take your documents you’re working on and save it to the Hard Disk, then index what you’re working on. In this case, it will then load those documents back up into memory when you wake the computer again.

In most cases, this can be helpful, but sometimes it can cause issues if it isn’t working correctly, so it is helpful to be able to turn hibernation off.

So here is how to do it:


1 Search for power in the start menu:
Power

2.       Click on edit power plan and it will open a new window, you then want to click on the advanced options:


3.       You will then be presented with a new window with a bunch of options, you will want to find the one marked sleep and open the submenu and you will find hibernate after option:


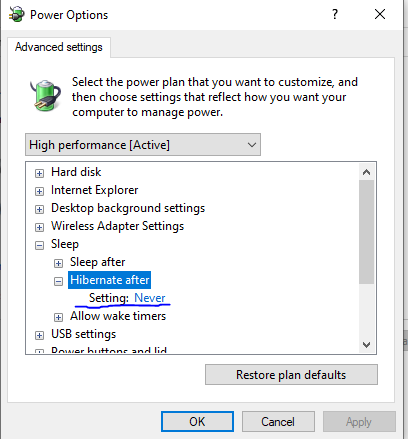
Here is where you can set the option to never go into hibernation.


I wouldn’t try and change this unless you’re having issues, but it is helpful to know how to get to the power option if you’re trying to troubleshoot issues on your pc.


Thanks for stopping by and I hope this was helpful.


If you're looking for help, please feel free me at my website, remote support is available for Windows 10 users:

http://sinntechnologies.net/ComputerRepairMiddletonWI

Comments

Popular posts from this blog

Windows 10 How To Create A Zipped Folder

If you’re here, you’re probably looking for a guide on how to Create a Zipped folder. I’m assuming at this point you know what is and just want to compress your files. So let's get started. 1.  Right-Click in the location you want to create a Zipped folder. 2. Click new, then select Compressed Zipped folder. 3. This will create a zipped folder in that location, then give the folder a name. Within the zipped folder, you can drag in whole folders or just files and they will then be compressed.   You can copy and paste folders in and out of the folder, and they will be compressed and decompressed as it is put in and taken out. In this example, we have a folder with a text file with some text. The size of the file in the none compressed folder: The size of the file now smaller in the compressed folder: You can also take a folder that isn’t compressed and make it compressed. Say you have a project with many folders and files and you’re done with it. You can send it to a zipped folde

How To Change Windows Default Sounds

 If you’re interested in how to change windows default sounds, you have come to the right place. Here we will cover everything there is to know about changing Windows default sounds. So let’s get started. 1.  Right-click on the desktop and click personalize. 2.    Then select Themes on the left. 3.    Then there will be an option for sounds. 4.    Once you click on sounds you will be greeted with a new window like below: 5. You will be greeted with all the sounds your computer makes. You can modify these sounds to whatever sounds you would like.    You will see there is a drop-down menu that says windows defaults unless you have already modified your sound in the past, which if you’re reading this, chances are you haven’t. By default, you can only choose no sound or the windows default sounds.  If you modify the sounds, which we will get to, you have the option to save the sound scheme as a different name. That is the save as button.  Then of course you have the delete option, to

Windows 10 Themes Part One

 If you’re here chances are you’re looking to learn how to make a new them in windows 10. You come to the right place as there is a lot of settings we’re going to be covering. This will be a two-part article as I don’t want these to get too long and give you time to digest some of the content and come back to it later. But let’s get started as we have a lot to cover in this tutorial. 1.  First You will want to right-click on your desktop and click the option personalize, like below: 2.    Then on the left-hand menu, we are going to want to select themes: You will be greeted with many options to customize your theme as pictured above. The Top half of the window is your current theme. The bottom half of the window is your saved themes. So they will be themes that you have created in the past that you can still use if you would like. There is also the canned themes that came with Windows that are already there. We’re going to be covering the top half of the first and making a new them